Understanding the Categorization Marker
When Categorify categorizes a product, it marks that product in Shopify so it won’t be processed again automatically. This mark is called the categorization marker, and you can choose how it works: as a standard Shopify product tag (the default) or as a private app metafield.
Understanding this marker—and choosing the right mechanism for your store—helps you avoid unexpected credit consumption and keep your product data organized.
What Is the Categorization Marker?
The categorization marker is a piece of data Categorify writes to every product it categorizes. Its job is to record that the product has been processed.
The marker works differently depending on which mechanism you choose.
Tag Mode (Default)
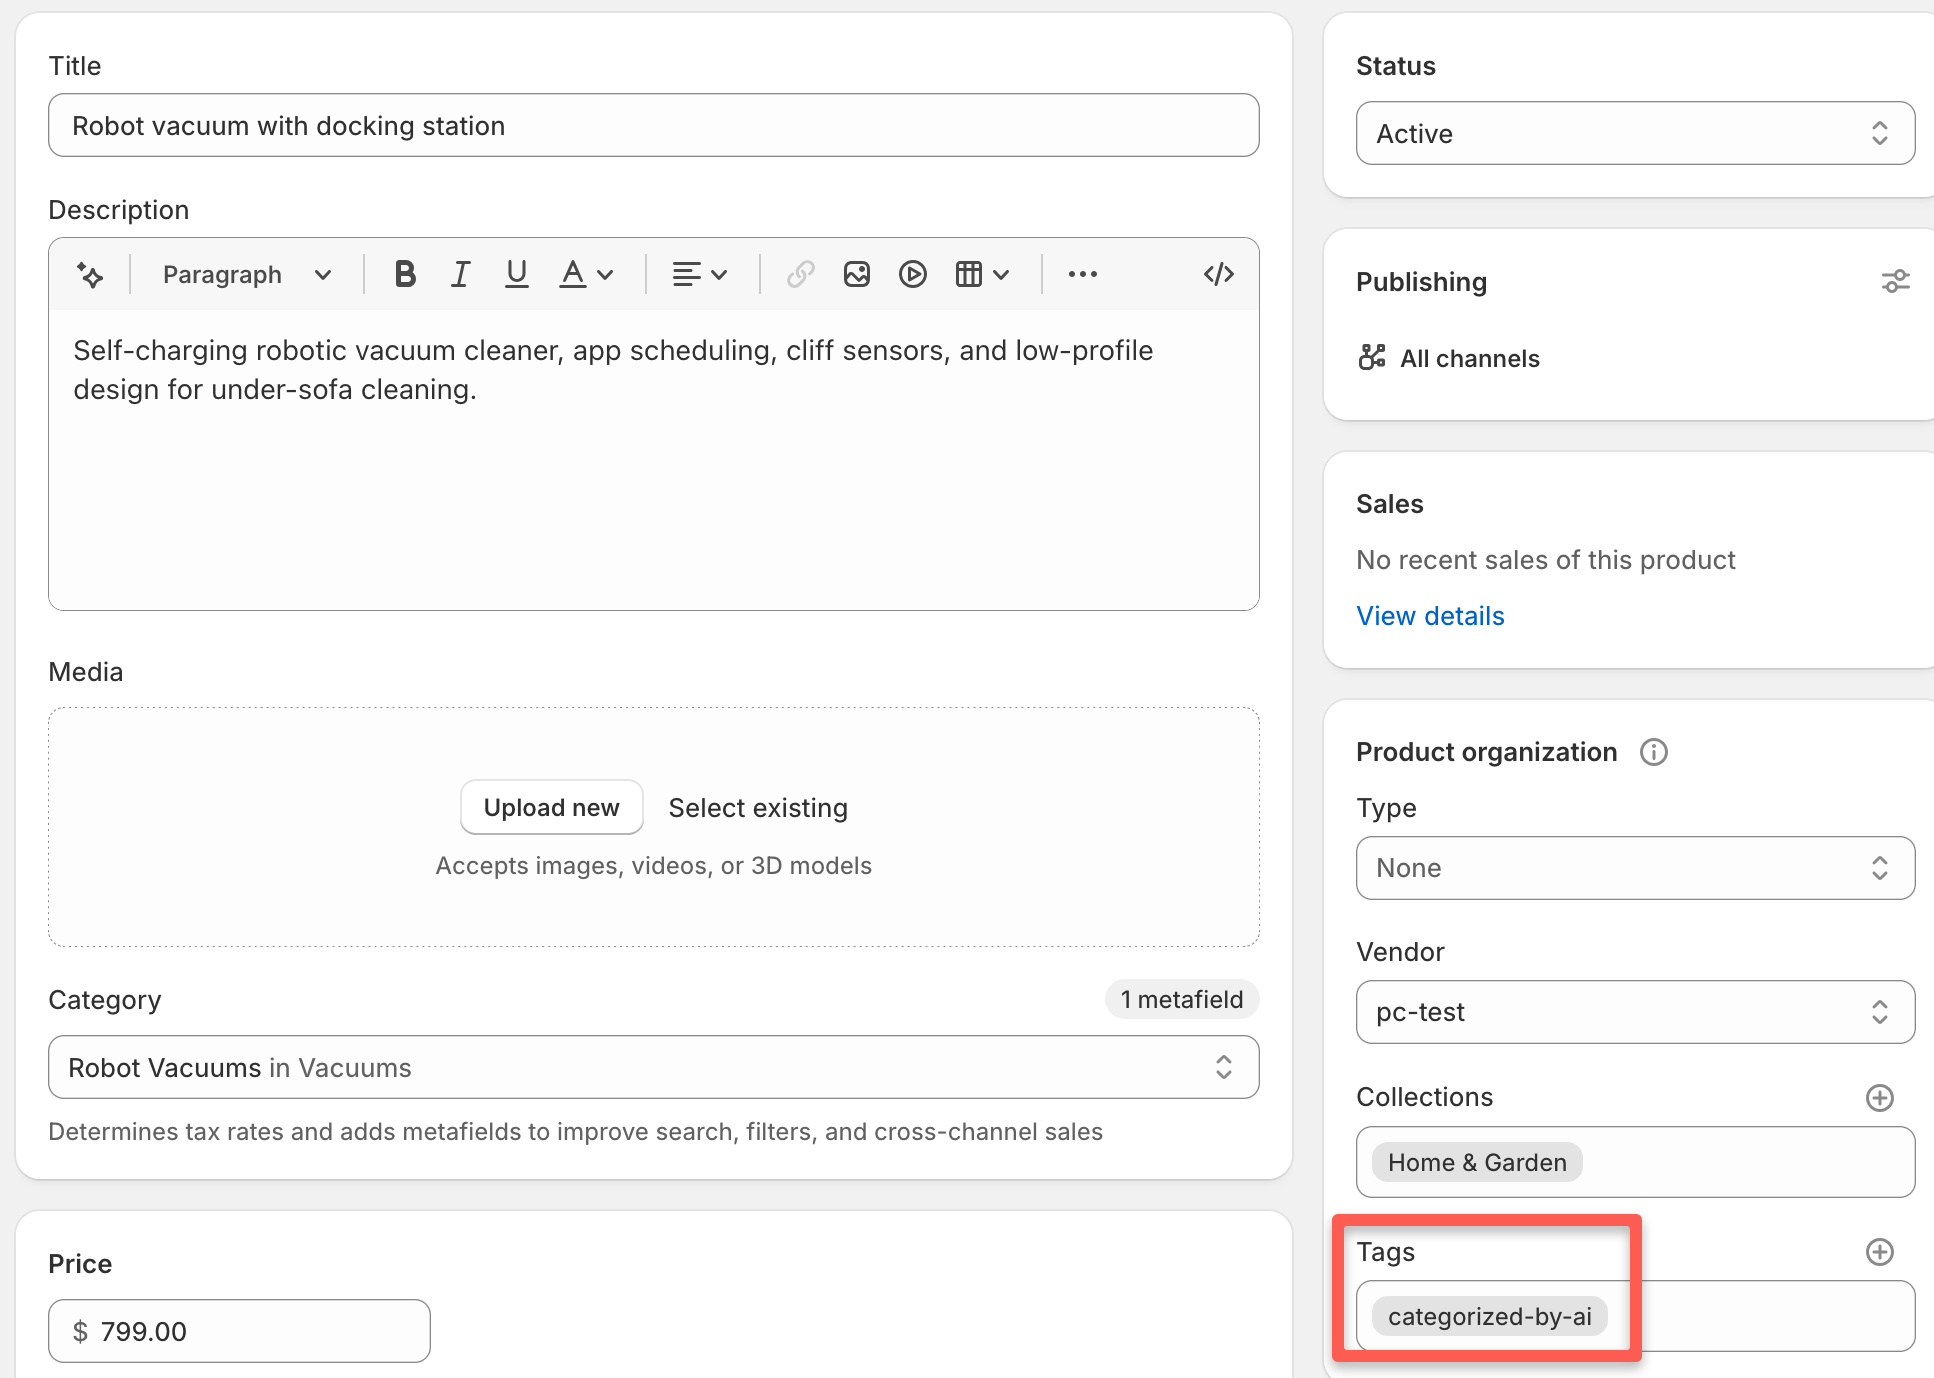
Categorify adds a standard Shopify product tag—by default categorized-by-ai—to every categorized product. You can see this tag in your Shopify admin when you open any categorized product:
- Go to Products in Shopify admin
- Open any product Categorify has categorized
- Look at the Tags section
- You’ll see
categorized-by-ailisted among the tags
The tag looks and works exactly like any other product tag. You can filter products by it, use it in automations, and see it throughout Shopify admin.
Metafield Mode
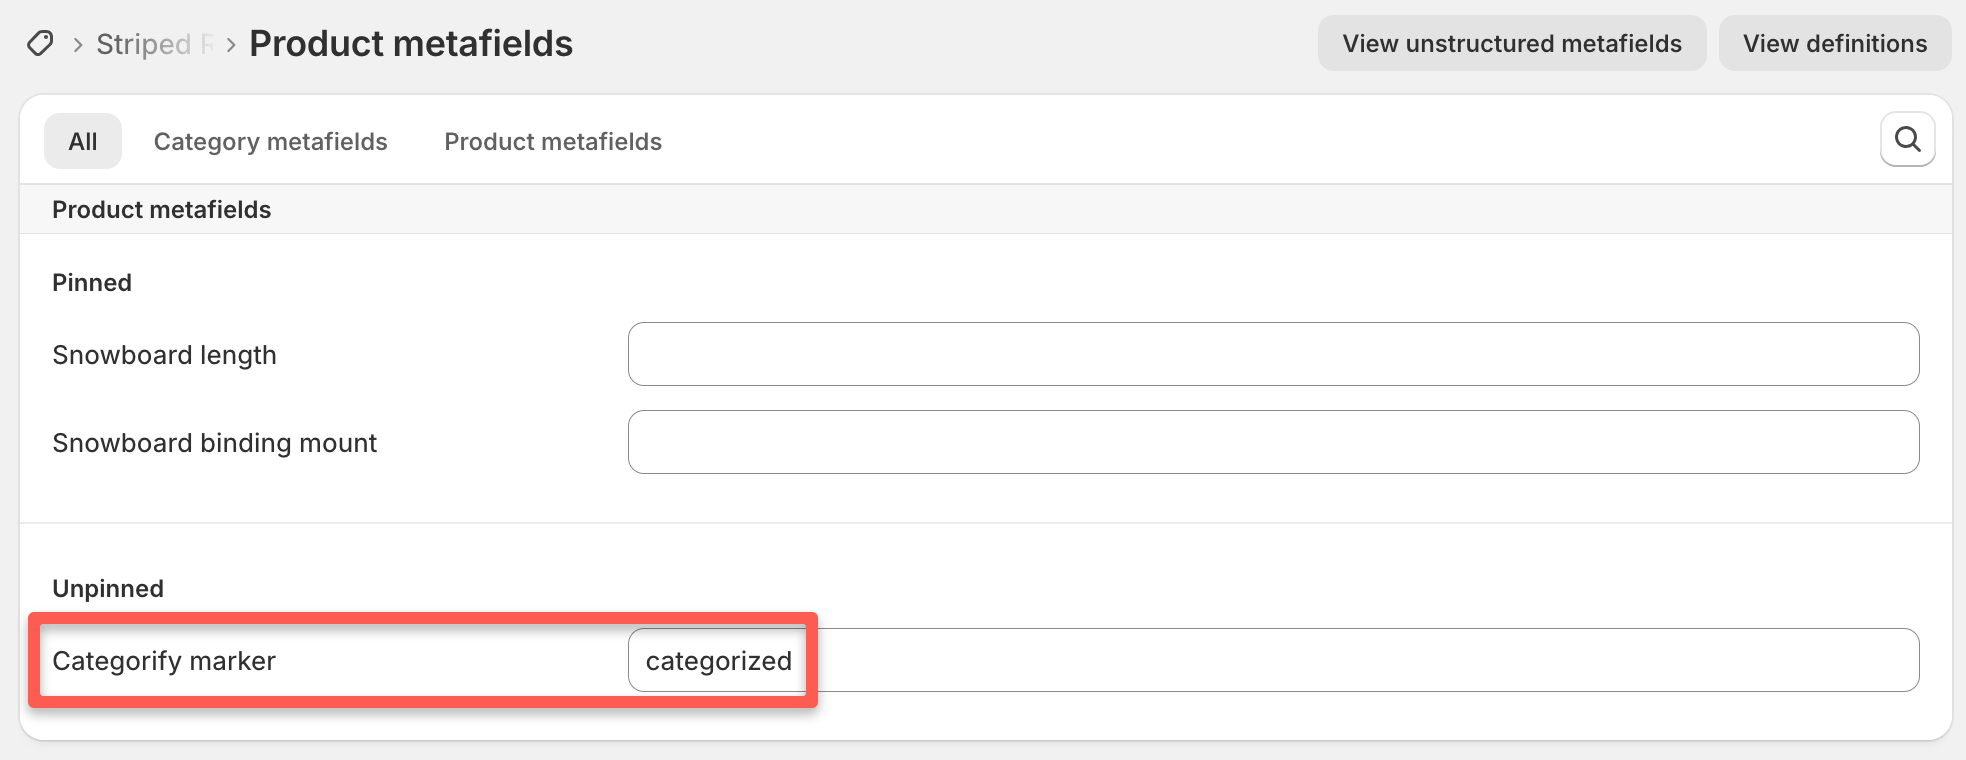
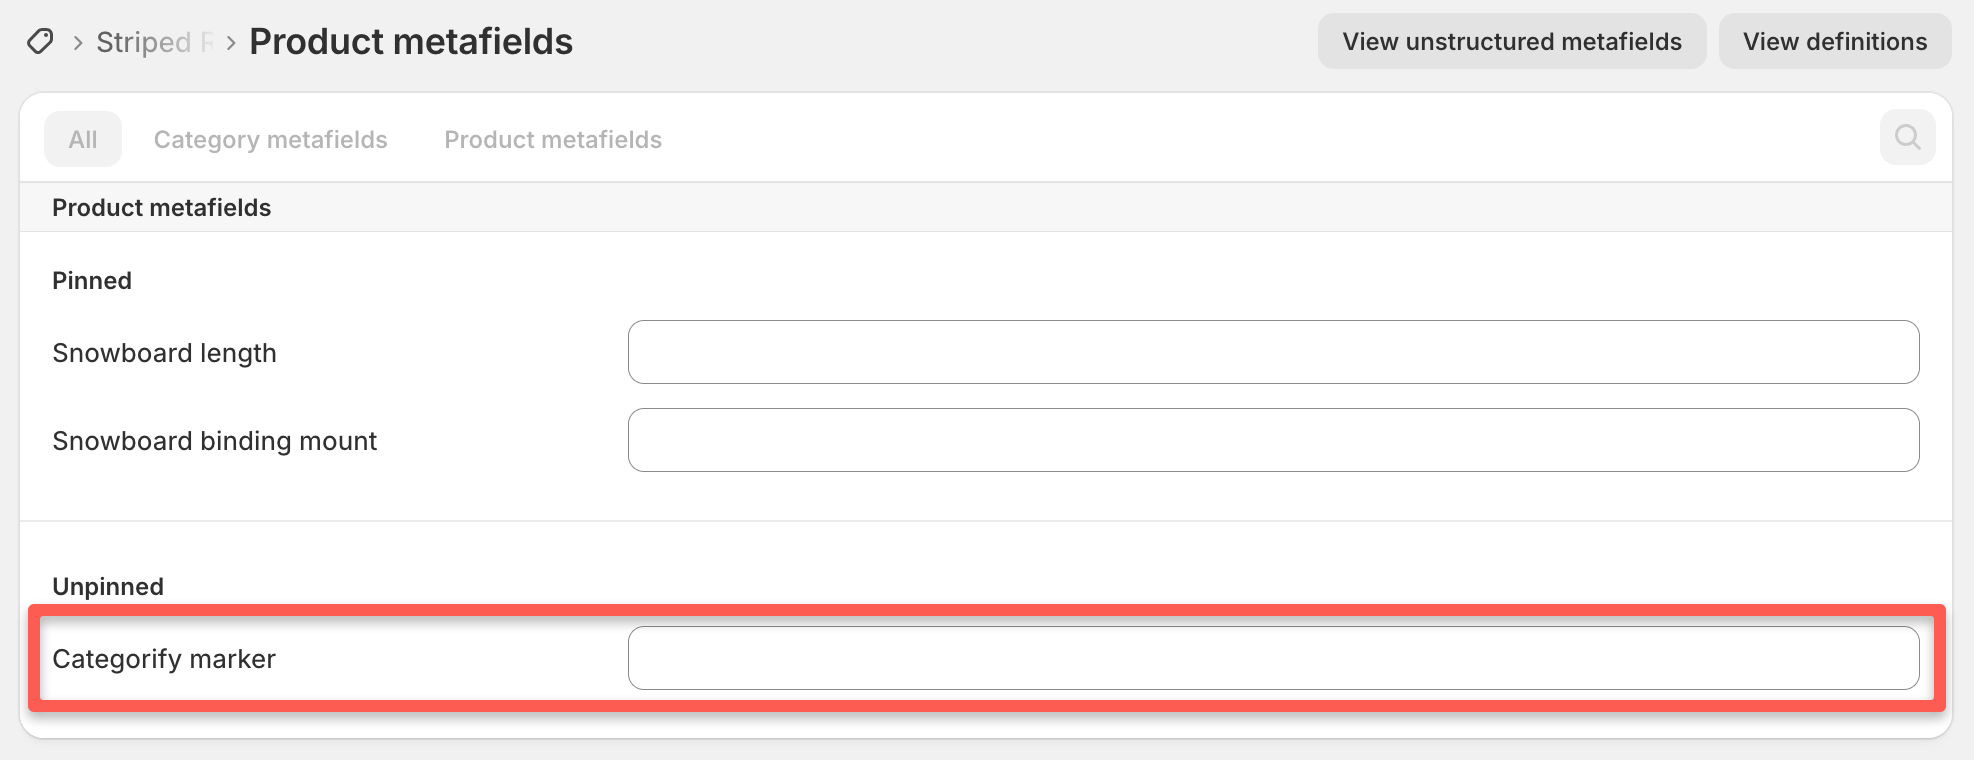
Instead of adding a product tag, Categorify writes a private app metafield called Categorify marker to each categorized product. The metafield has the value categorized. You can see this metafield in Shopify admin by opening a categorized product and scrolling to the Metafields section.
The metafield is owned by the Categorify app:
- You cannot delete it through Shopify admin (it’s app-controlled)
- You can edit its value — see Re-triggering Categorization in Metafield Mode below
- It does not appear in your product tags
Metafield mode is useful when you manage product tags carefully or have tag-based automations you don’t want Categorify’s marker to affect.
Why Does the Marker Exist?
The categorization marker serves two important purposes.
1. Prevents Infinite Loops
When Categorify assigns a category to a product, it updates that product in Shopify. Without the marker, this would trigger an endless loop:
- Categorify categorizes a product and assigns a category
- Assigning the category updates the product
- Shopify sees the update and sends a notification
- If automatic categorization is enabled, Categorify receives this notification
- Categorify thinks “this product was updated—I should categorize it!”
- It categorizes the product again, which updates it again…
- This continues forever, wasting your credits
The marker breaks this loop. Before categorizing a product automatically, Categorify checks whether it has already been marked. If yes, it skips the product.
2. Tracks Which Products Have Been Categorized
The marker provides a way to see which products Categorify has processed:
In tag mode: Filter your products by the categorized-by-ai tag in Shopify admin to see all categorized products. Products without this tag haven’t been categorized yet.
In metafield mode: You can use Shopify’s metafield filters or the Shopify API to find products with the marker metafield set. Standard tag-based filtering in the Shopify admin Products page won’t surface these products, since no tag is written.
Choosing a Marker Mechanism
You can change the marker mechanism in Categorify Settings.
Choose Tag Mode When:
- You want to filter categorized products by tag in Shopify admin
- You use tag-based automations that should include Categorify-processed products
- You’re new to Categorify and want the simplest, most visible setup
Choose Metafield Mode When:
- You manage product tags carefully and don’t want an extra tag added automatically
- You have third-party apps or Shopify automations triggered by tag changes that you don’t want to interrupt
- You prefer to keep Categorify’s tracking data separate from your product tags
How to Change the Mechanism
- Open Apps → Categorify
- Click Settings
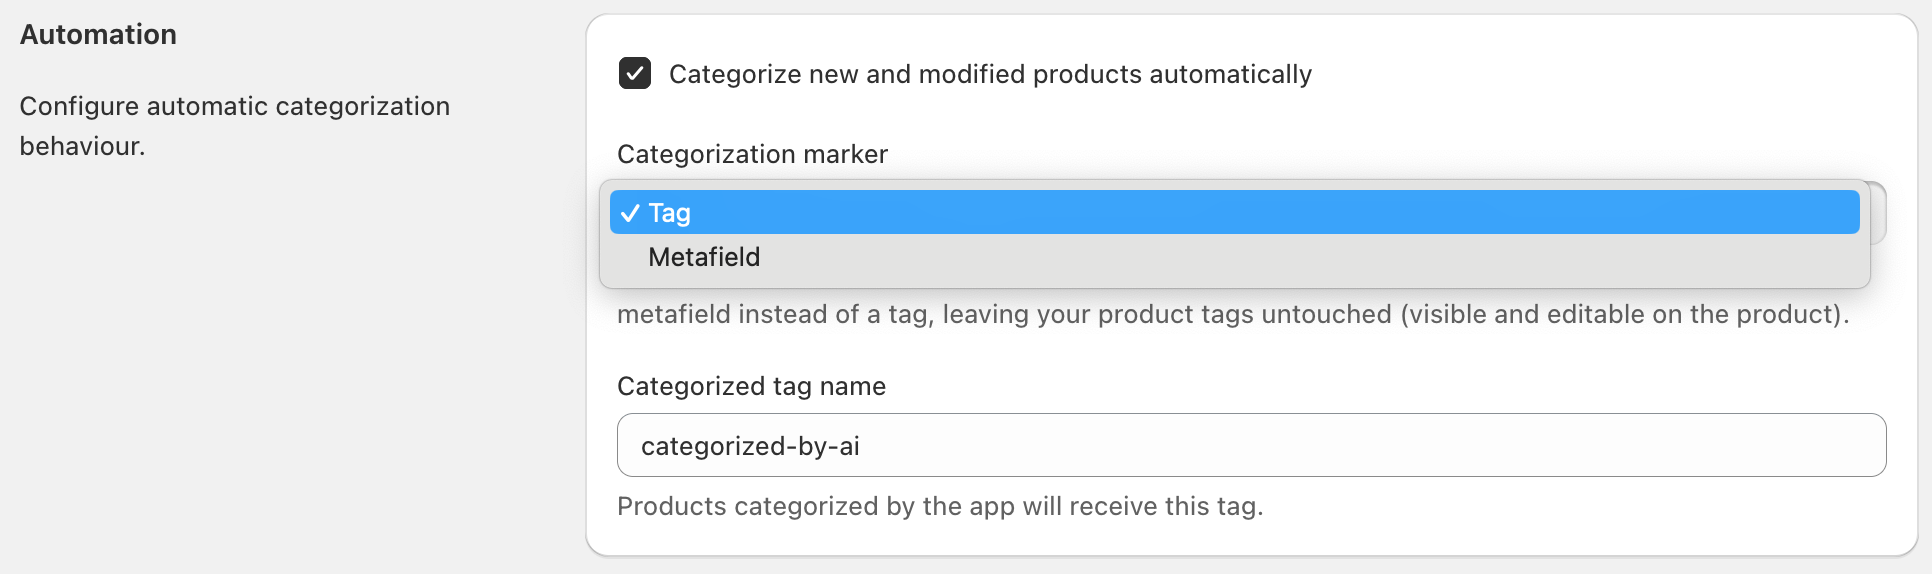
- In the Automation section, find Marker mechanism
- Select Tag or Metafield
- Click Save
Warning: Switching Mechanisms Triggers Re-categorization
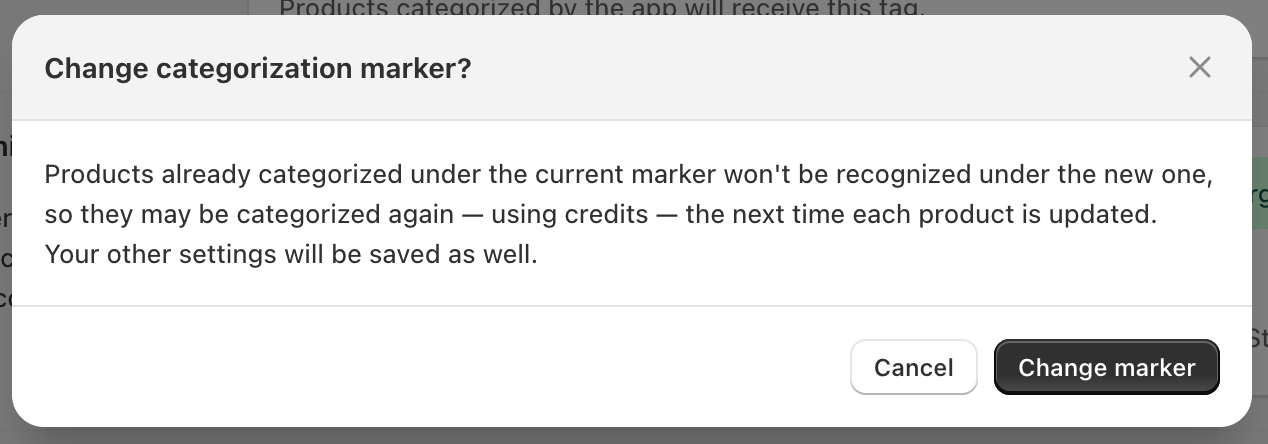
Important: When you switch mechanisms, Categorify can no longer recognize products marked under the old mechanism. If automatic categorization is enabled, those products will be re-categorized the next time they’re updated—consuming credits.
Example:
- You have 500 products marked with the
categorized-by-aitag (tag mode) - You switch to metafield mode
- Categorify now looks for the metafield marker, not the tag
- Your 500 products still have the tag but not the metafield
- The next time any of those products are updated, they’ll be re-categorized (consuming credits)
Categorify shows a confirmation dialog before saving a mechanism change so you can consider the implications before proceeding.
How the Marker Works with Automatic and Manual Categorization
With Automatic Categorization
When automatic categorization is enabled:
- A product is created or updated in Shopify
- Shopify notifies Categorify about the change
- Categorify checks for the marker (tag or metafield, depending on your setting)
- If NOT marked: Categorify categorizes the product and adds the marker
- If marked: Categorify skips the product (already processed)
Each product is only automatically categorized once, even if you update it multiple times.
With Manual Categorization
When you manually categorize products (single product, bulk selection, or collection), the marker is ignored:
- Categorify categorizes products even if they already have the marker
- This lets you re-categorize products whenever you need to
- The marker is updated after categorization completes
Manual categorization always runs regardless of marker state.
What Happens If You Remove or Change the Marker?
In Tag Mode: Removing the Tag
If you remove the categorized-by-ai tag from a product:
- If automatic categorization is disabled: Nothing happens immediately. The product will be re-categorized the next time automatic categorization is triggered.
- If automatic categorization is enabled: The next time you update that product, Categorify will re-categorize it, consuming another credit.
This means:
- Removing the tag from one product → it gets re-categorized on next update (1 credit)
- Removing the tag from 100 products → they all get re-categorized on next update (100 credits)
Unless you specifically want a product re-categorized, leave the tag in place.
In Metafield Mode: Editing the Metafield Value
You cannot delete the Categorify marker metafield—it’s controlled by the app. However, you can edit its value in Shopify admin:
- Value
categorized(unchanged): Categorify recognizes the product as processed and skips it - Any other value or empty: Categorify treats the product as unprocessed and will re-categorize it on the next update (if automatic categorization is enabled)
This gives you a way to selectively allow re-categorization in metafield mode without removing anything.
Re-triggering Categorization in Metafield Mode
If you want a product re-categorized in metafield mode, you have two options:
Use manual categorization (recommended):
- Go to the product in Shopify admin
- Click More actions → Categorize product
- Categorify re-categorizes it immediately, regardless of the marker
Edit the metafield value:
- Open the product in Shopify admin
- Scroll to the Metafields section
- Find Categorify marker
- Edit the value to anything other than
categorized, or clear it - The next time the product is updated, Categorify will re-categorize it automatically
When Should You Change or Remove the Marker?
There are very few situations where this is necessary:
You want a specific product re-categorized: The cleanest approach is manual categorization—it’s immediate and doesn’t depend on a subsequent product update triggering automatic categorization.
You’re troubleshooting categorization: In rare cases, clearing the marker from a test product lets you observe how Categorify handles it from scratch.
For almost all situations, use manual categorization instead:
- Go to the product in Shopify admin
- Click More actions → Categorize product
- Categorify will re-categorize it immediately, regardless of the marker state
- The marker is updated after categorization completes
Customizing the Tag Name (Tag Mode Only)
If you’re using tag mode, you can change the tag name from the default categorized-by-ai to any name you prefer.
How to Change the Tag Name
- Open Apps → Categorify
- Click Settings
- In the Automation section, change Categorized tag name
- Click Save
This field only appears when the marker mechanism is set to Tag. It has no effect in metafield mode.
What Happens When You Change the Tag Name
When you change the tag name:
- Categorify immediately starts using the new tag name for all future categorizations
- Products with the old tag are treated as uncategorized by automatic categorization
- If automatic categorization is enabled, those products will be re-categorized on their next update
Example:
- You have 1,000 products with the tag
categorized-by-ai - You change the tag name to
my-custom-tag - Categorify now looks for
my-custom-tagwhen checking processed products - Your 1,000 products still have
categorized-by-ai, notmy-custom-tag - The next time any of those products are updated, they’ll be re-categorized (consuming credits)
When to Change the Tag Name
Almost never. The default categorized-by-ai tag is clear and descriptive, and won’t conflict with any tags you’d normally use.
Change it only if:
- You have a specific business requirement for a different tag name
- You’re integrating Categorify with other systems that depend on specific tag names
- You understand the implications and are prepared to handle re-categorization
Never change the tag name casually or frequently. Each change can trigger unwanted re-categorization and consume credits.
Common Questions
What’s the difference between tag mode and metafield mode?
Tag mode adds a standard Shopify product tag (categorized-by-ai by default) that’s visible in the Shopify admin Tags field and usable in tag-based filters and automations. Metafield mode writes a private app metafield instead, leaving your product tags untouched. Both prevent infinite loops and track processed products—the choice is about where that data lives.
Can I manually add the categorized tag to products?
In tag mode, technically yes—but you shouldn’t. If you manually add the tag to a product that hasn’t been categorized, automatic categorization will skip it (thinking it’s already been processed), and the product won’t get a category assigned.
What if I want to re-categorize a product that already has the marker?
Use manual categorization:
- Go to the product in Shopify admin
- Click More actions → Categorize product
- Categorify will re-categorize it regardless of the marker
Don’t remove the tag or edit the metafield value just to trigger automatic re-categorization—manual categorization is faster and more predictable.
Can I filter products by whether they’ve been categorized?
In tag mode: yes. Filter by the categorized-by-ai tag in Shopify admin to see all categorized products. In metafield mode, standard tag filtering won’t work since no tag is written—use Shopify’s metafield filter options or query via the Shopify API instead.
I switched marker mechanisms—why are products being re-categorized?
When you switch mechanisms, Categorify stops recognizing products marked under the old mechanism. If automatic categorization is enabled, those products will be re-categorized on their next update. This is expected behavior. See Warning: Switching Mechanisms Triggers Re-categorization above.
Does the tag affect anything besides Categorify?
In tag mode, categorized-by-ai is a standard Shopify product tag—other apps and automations that react to tags will see it. It doesn’t affect product display, search, or any built-in Shopify functionality unless you specifically build features that use this tag. In metafield mode, only the Categorify app can read and write the marker metafield.
What if I delete and reinstall Categorify?
Tags and metafields remain on your products. If you reinstall Categorify and enable automatic categorization, it will respect the existing markers—products with the marker won’t be re-categorized automatically.
Summary
| Tag Mode | Metafield Mode | |
|---|---|---|
| Default | ✓ Yes | No |
| Where marker lives | Product tags | App metafield |
| Visible in Tags field | ✓ Yes | No |
| Filterable by tag in admin | ✓ Yes | Via metafield filter |
| To re-trigger categorization | Remove tag (or use manual categorization) | Edit metafield value (or use manual categorization) |
| Tag name customizable | ✓ Yes | N/A |
For 99% of users, the default tag mode works perfectly—it just runs in the background. Switch to metafield mode only if you have a specific reason to keep Categorify’s marker out of your product tags.
Next Steps
- How Categorization Works - See where the marker fits in the full categorization pipeline
- Configuring Settings - Change the marker mechanism and other categorization behavior
- Categorizing Products - How manual and automatic categorization interact with the marker