Categorizing Products
Categorify offers multiple ways to categorize your products, from fully automatic background processing to manual on-demand categorization. This guide explains each method and when to use it.
Overview of Categorization Methods
Categorify can categorize products in four ways:
Automatic categorization - Products are categorized in the background as they’re created or modified in Shopify
Single product - Categorize one product at a time from its detail page
Bulk selection - Select multiple products and categorize them together
Entire collection - Categorize all products in a collection at once
All categorization happens in the background. You don’t need to wait for results—Categorify queues the requests and processes them while you continue working.
Method 1: Automatic Categorization
Automatic categorization runs in the background whenever you create or modify products in Shopify. Once enabled, you never need to manually categorize products again.
How It Works
When automatic categorization is enabled, Categorify monitors your Shopify store for product changes. Whenever a product is created or updated, the app checks if it already has the categorized-by-ai tag. If not, the product is automatically added to the categorization queue.
Important: Automatic categorization only processes products that don’t have the categorization tag. This prevents infinite loops where categorizing a product triggers another categorization.
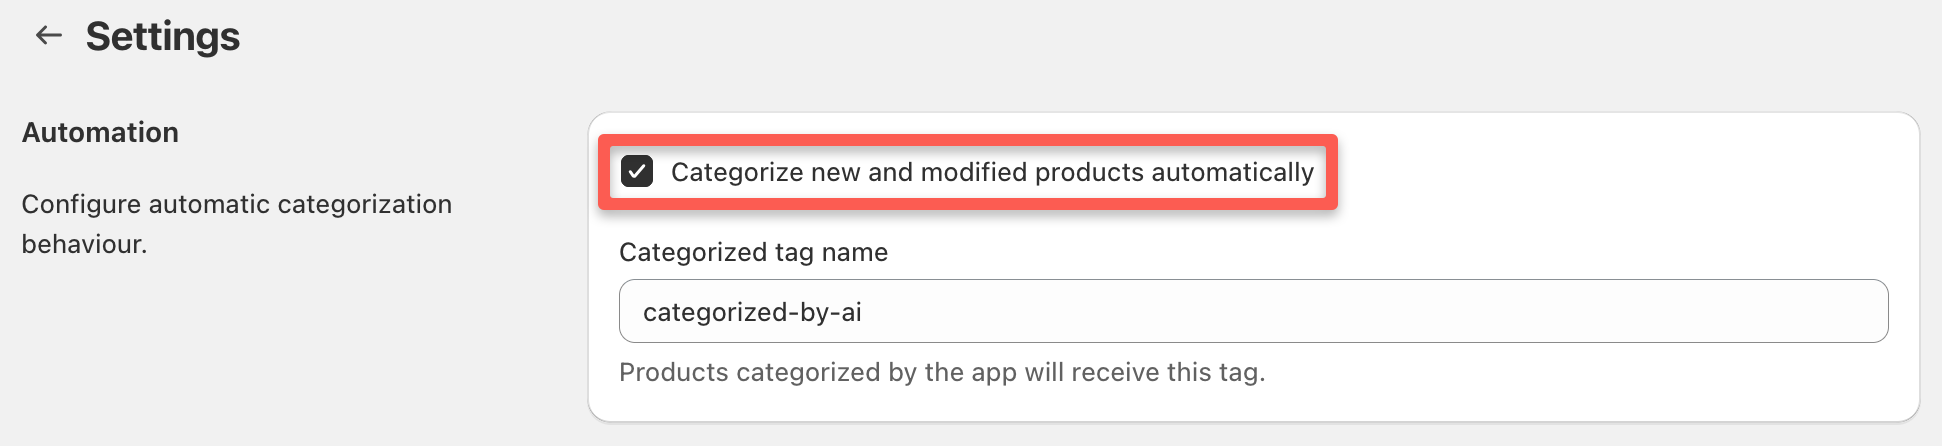
Enabling Automatic Categorization
- Open Apps → Categorify in your Shopify admin
- Click Settings in the top navigation
- In the Automation section, check Categorize new and modified products automatically
- Click Save
From this point forward, any new or modified products will be categorized automatically.
What Triggers Automatic Categorization
Automatic categorization runs when products are:
- Created through Shopify admin
- Created via the Shopify API
- Modified through Shopify admin
- Modified via the Shopify API
- Imported through third-party apps that use the Shopify API
What does NOT trigger automatic categorization:
- CSV imports - Products imported from CSV don’t trigger webhooks automatically. After importing, use one of the manual methods below to categorize the imported products.
When to Use Automatic Categorization
Use automatic categorization when:
- You regularly add new products to your store
- You update product descriptions and want categories to stay current
- You want hands-off categorization without manual intervention
- You’re comfortable with the current settings and don’t need to review each result
Recommendation: Test manual categorization on a sample of products first to ensure your settings produce expected results before enabling automatic categorization.
Method 2: Single Product Categorization
Categorize individual products directly from their detail page in Shopify admin.
How to Categorize a Single Product
- Go to Products in your Shopify admin
- Click on any product to open its detail page
- Click the More actions button (three dots) in the top-right corner
- Select Categorize product from the dropdown menu
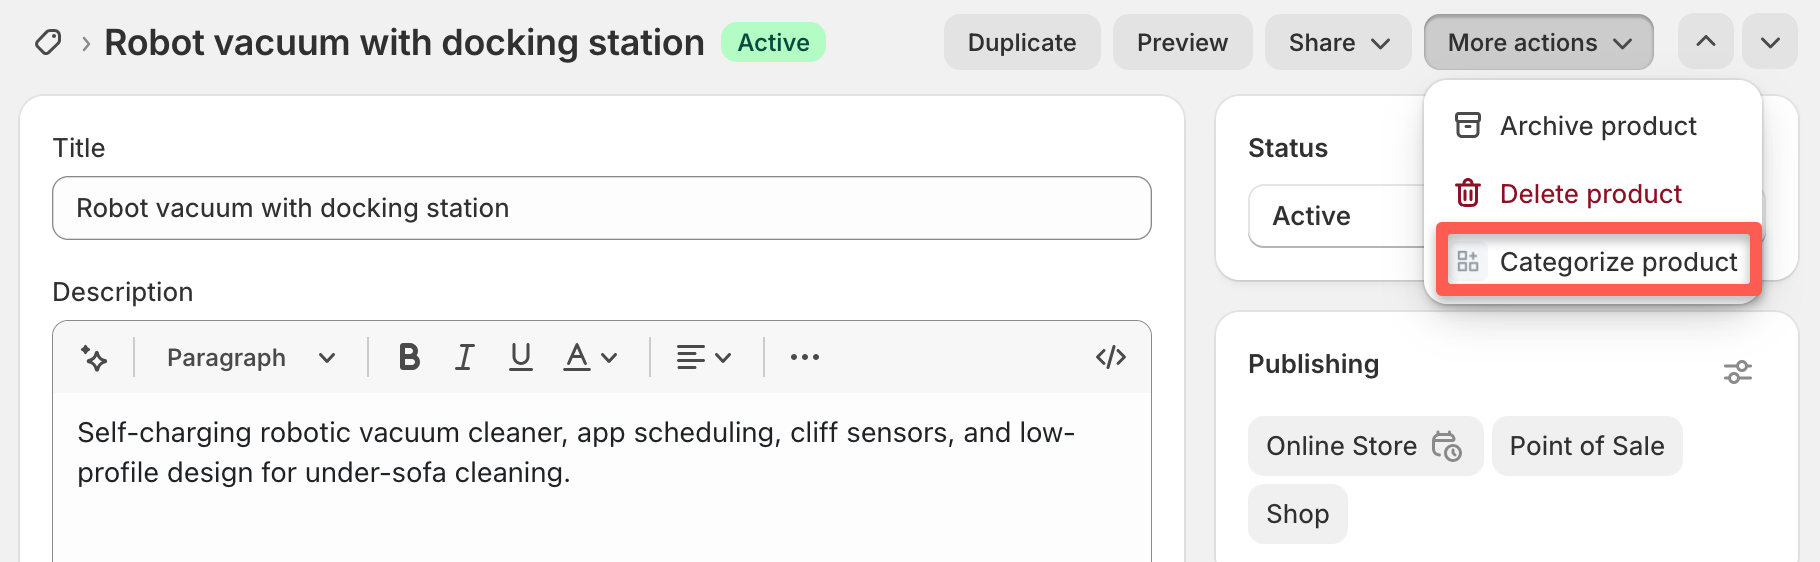
The product is added to the categorization queue and processed in the background. You don’t need to wait on the page—continue working and check results later on the dashboard.
When to Use Single Product Categorization
Use this method when:
- Testing categorization on specific products
- Re-categorizing a product after improving its description
- Categorizing products one at a time as you create them
- Verifying categorization works before bulk processing
Method 3: Bulk Product Categorization
Categorize multiple products at once from the Products page.
How to Categorize Multiple Products
- Go to Products in your Shopify admin
- Check the boxes next to the products you want to categorize (select as many as needed)
- Click the ••• (more actions) button at the top of the products list
- In the Apps section of the dropdown, select Categorize products
- Confirm the action when prompted
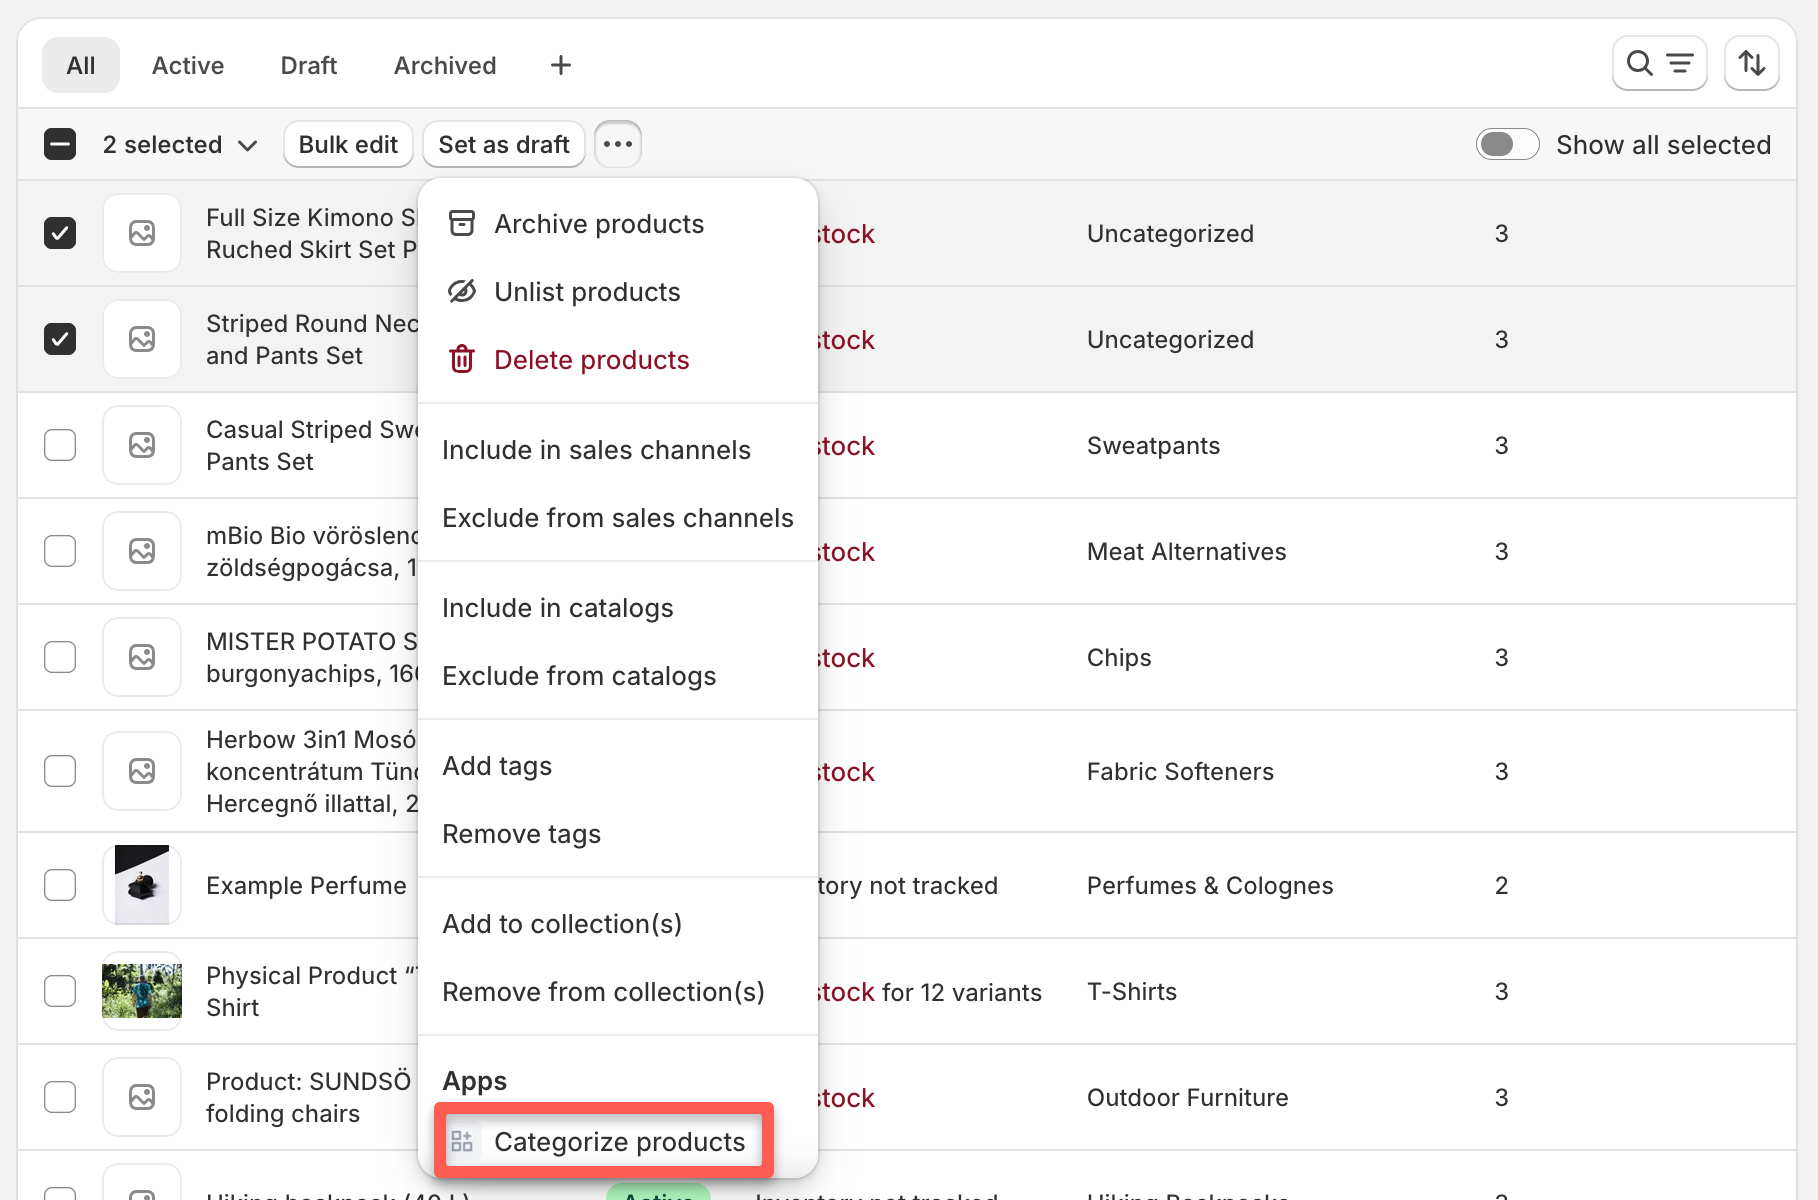
All selected products are added to the categorization queue and processed in the background.
When to Use Bulk Categorization
Use this method when:
- Categorizing products after a CSV import
- Re-categorizing a group of products with improved descriptions
- Processing products that previously returned no category
- Categorizing new inventory additions in batches
Tip: You can select all products on the current page by checking the box in the header row, or use filters to narrow down to specific product types before selecting.
Method 4: Collection Categorization
Categorize all products in a collection at once.
How to Categorize a Collection
- Go to Products → Collections in your Shopify admin
- Click on any collection to open its detail page
- Click the More actions button (three dots) in the top-right corner
- Select Categorize collection from the dropdown menu
- Confirm the action when prompted

All products in the collection are added to the categorization queue and processed in the background.
When to Use Collection Categorization
Use this method when:
- Categorizing a seasonal collection of new products
- Re-categorizing all products in a specific category
- Processing products organized by vendor or product type
- Bulk categorizing products that share characteristics
Note: Large collections may take several minutes to process depending on the number of products.
Monitoring Categorization Progress
Regardless of which method you use, all categorizations happen in the background. You can monitor progress without staying on the page where you started the categorization.
Latest Categorizations Pane
The Latest Categorizations pane on the Categorify dashboard shows real-time progress:
- Open Apps → Categorify to view the dashboard
- Look at the Latest categorizations pane
- Watch as products are processed and results appear
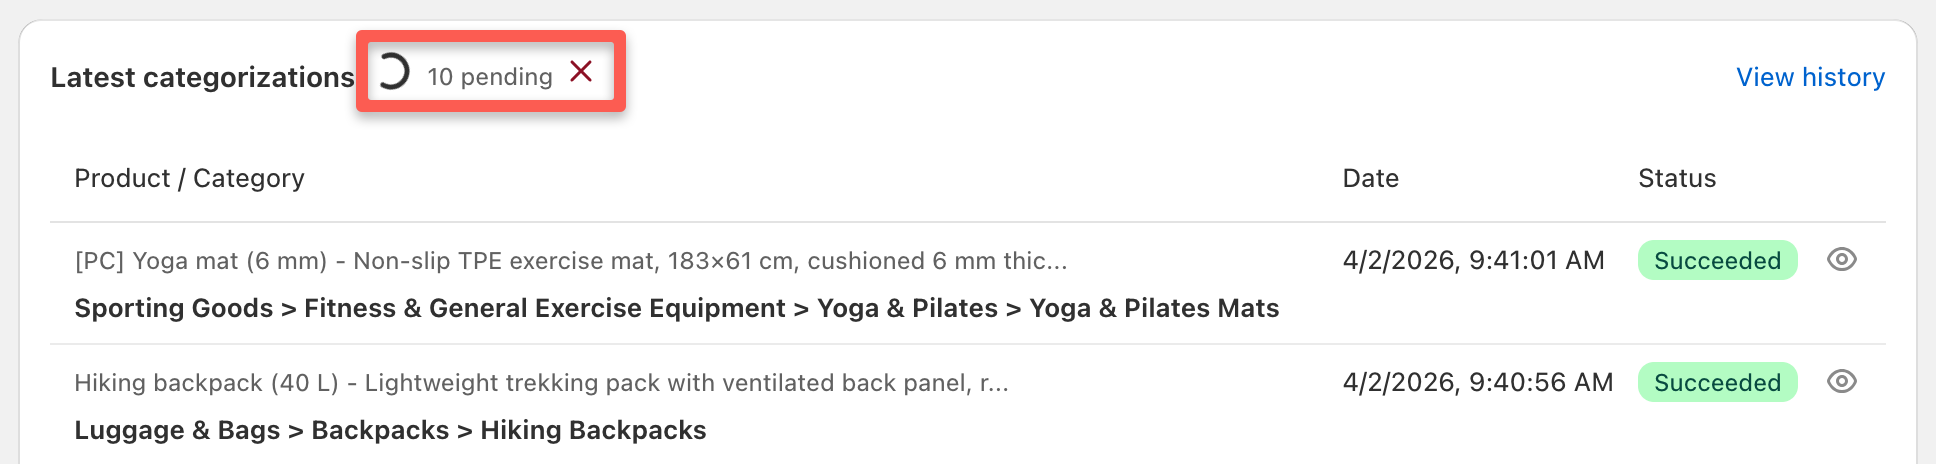
While categorizations are processing, you’ll see:
- Progress information - Number of categorizations remaining in the queue
- Cancel button - Stop processing if needed (see below)
- Real-time updates - New results appear automatically as they complete
For complete details on the dashboard and what each section shows, see Dashboard Overview.
Viewing Results in History
All categorization requests—automatic and manual—are logged in the History page:
- Click History in the top navigation of Categorify
- View all past categorizations with status indicators
- Filter by date, source, or status to find specific results
- Click View on any entry to see complete details
For details on using filters and understanding status indicators, see Viewing Categorization History.
Canceling Ongoing Categorizations
If you need to stop categorizations in progress (for example, to adjust settings before processing completes):
- Open the Categorify dashboard
- In the Latest categorizations pane, click Cancel ongoing categorizations
- Confirm the action
This immediately:
- Stops processing remaining products in your queue
- Removes them from the queue entirely
- Does not consume credits for cancelled categorizations
- Cannot be undone—you’ll need to re-queue products if you change your mind
When to cancel:
- You realize settings need adjustment before results are final
- Wrong products were selected for categorization
- You want to add custom instructions before processing
Important Notes About CSV Imports
CSV imports do not trigger automatic categorization webhooks. This is a Shopify limitation—products imported from CSV don’t generate the same webhook events as products created through other methods.
After importing products from CSV:
- Use bulk selection to select the imported products
- Click ••• → Categorize products in the apps section
- Or categorize the entire collection if imports went to a specific collection
This ensures your imported products get categorized even with automatic categorization enabled.
Choosing the Right Method
Use automatic categorization when:
- You add new products regularly
- You want hands-off operation
- You’ve tested and are satisfied with results
Use single product categorization when:
- Testing specific products
- Re-categorizing after description changes
- Working with high-value products that need verification
Use bulk categorization when:
- Processing CSV imports
- Re-categorizing groups of products
- Handling products that need updated categories
Use collection categorization when:
- All products in a collection need categorization
- Working with seasonal or themed collections
- Products are organized by collection
Understanding the Categorization Tag
Regardless of which method you use, successfully categorized products receive the categorized-by-ai tag.
This tag serves two purposes:
- Prevents re-categorization - Products with this tag are skipped by automatic categorization to avoid infinite loops
- Tracks processed products - You can see which products have been categorized in Shopify admin
Important: Don’t remove this tag unless you want the product to be re-categorized automatically. If you need to re-categorize a product, use one of the manual methods instead of removing the tag.
Next Steps
Now that you understand the categorization methods:
- Dashboard Overview - Monitor your categorizations in real-time and track credit usage
- Viewing Categorization History - Access complete categorization history with filtering options
- Categorization Status Indicators - Understand what green, yellow, and gray badges mean
- Configuring Settings - Adjust automatic categorization and AI instructions for better results
Ready to start categorizing? Choose the method that fits your workflow and begin processing products.